Skip table of contents

Customize Toolbar

Creation of a Customized Toolbar with the functions you need to have all the time on your screen.

Note that a toolbar can be created for each technology (Milling, Turning, EDM, Layout Design etc.) but this is only limited to one toolbar by technology.

The Customize toolbar file is located in the ini directory under the name of “tbr_product_mill_classic.usr”.

To create your customize toolbar

Click on the Tools menu and then Customize Toolbar.

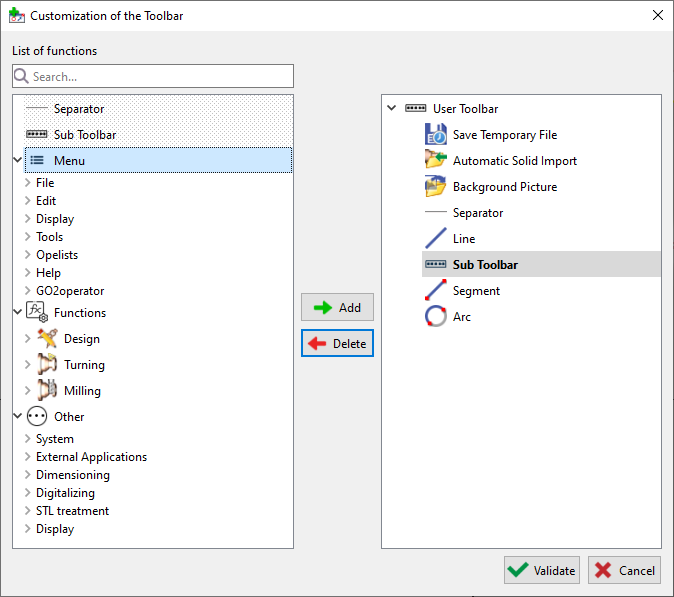
  1. The list of the functions available is located on the left hand side of the dialogue box;

  2. The functions are classified  based on the menu and tabs, you can choose functions from list.

    1. Click on the function you need and click on Add or Double click on it, the function appears on the User Toolbar editor, on the right hand side of the dialogue box.

    2. To delete a function, click on it on the User Toolbar editor and click on Delete.

    3. You can also add separators with a click on Separator to define categories on your toolbar and even create sub toolbars by first clicking Sub Toolbar and then selecting the functions that will directly go under it.

Customize toolbar.png

  1. You can move the functions and change their position with a Drag and Drop action.

  2. Click on Validate when you chose all the functions needed.

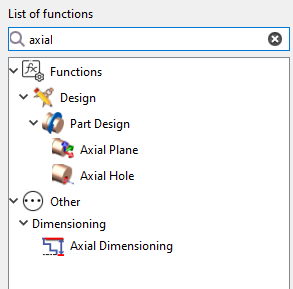
You can also utilize the search option to quickly locate specific functions by their names, making it easier to find and customize toolbar options.

Customize Toolbar-20240206-153644.png
Customize Toolbar2-20240206-155700.png

Sub Toolbar

Once created, the Sub toolbars are displayed with a black arrow:

  • If you click the icon, the relative command is launched,

  • If you do a longer click on the icon, the sub toolbar is open.

  • Then, the function you choose is launched and also becomes the first one on the top, such as the circle here.

Location of the Toolbar

You can let the Toolbar free on your screen. You can also put the Toolbar on the right hand side bar like shown in the image or anywhere else (left, top and bottom bars)

To manipulate the bar,  on the left side of it with dots, click and hold and then you can move it anywhere and place it on the side if you want. To move it from a bar, it is the same procedure.

Note : If the customized toolbar does not appear, do a right click on the top bar of GO2cam:

 Check the box in front of 'User' to make the toolbar appear.


JavaScript errors detected

Please note, these errors can depend on your browser setup.

If this problem persists, please contact our support.