Skip table of contents

Tool Page

Description of Page

They can be milling, turning, swiss-type or wire-cut edm, all the tools are described in similar pages, divided in 2 tabs:

  • Tool: description of tool and definition of holders,

  • Options: special information, such as the price, supplier and reference and parameters of identification.

On top of each page, you can find common actions:

INIT.png

Reset the page with default values of parameters

SAVE.png

Save the tool with all modification in Tool and Options pages and the holders if defined.

trash.png

Delete the current tool from library.

Tool Tab

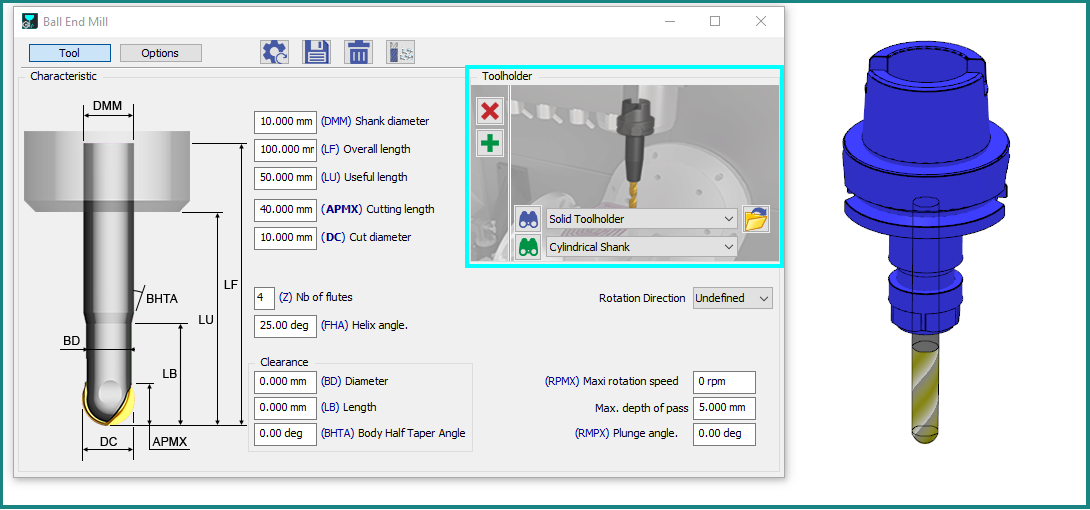
On the Left side of dialog, you can find:

  • a comprehensive image

  • characteristics defined by ISO standards identifyers, such as APMX for cutting length and DC for Cut Diameter.

When the tool page is open, the tool is kept in position just besides the dialog! You can see it changing according to your modifications in the dialog.

Tool Page1.png

On the right side of the dialog, in the clear blue frame, are defined the different stages of the tool assembly.

Let’s watch the video below to understand the process of definition.

Turning: Use of standards for inserts

For Turning tools with inserts, we have a special parameter on the top of the toolpage. In there, you can define the ISO standards of inserts. When you enter the standard, the insert is automatically created with the correct ISO characteristics! Please watch the video below.

Process of Creation of a Tool with its holders.

This video shows several interesting topics, such as the creation of insert by respecting ISO standard and the process to select holders.

Video Process:

  • download the solid insert holder (step file) from a tool-builder database (here ISCAR),

  • in GO2cam, creation of tool by defining the insert ISO standard (here WNMG 080404-GN),

  • import of step file and definition of insert holder symbol file,

  • once the insert holder is saved, load it in the tool page,

  • then modify the KAPR angle to adjust the insert in its holder.

Creation of turning tool with Standard insert.png

Options Tab

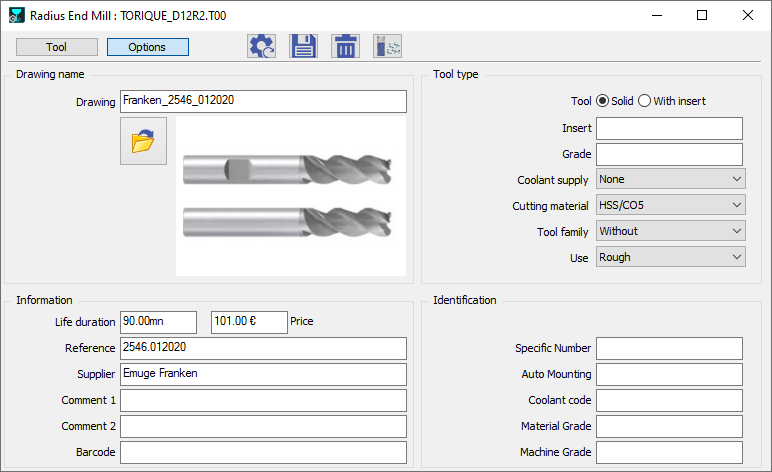
This page does not include mandatory information, but some parameters have a great interest
Tool Page2.png
  • Drawing: you can load and also visualize an image of the tool.

Admissible file formats are: .png, .bmp, .jpeg, .tiff and also .dxf, .dwg and .pce.

  • Information: general information about the tool supplier and reference.

    • Life duration and Price are necessary if you want to estimate the workpiece production cost. Click here for more information: Estimation of Costs.

    • Barcode is a recent adding: the purpose is to be able to export this information in the workshop document.

  • Tool Type: specific information about the tool geometry and material.

    • You can declare that the tool belongs to a family; for more information bout this topic: Tools Families.

  • Identification: specific identification number and coolant can be given here.

    • Material and Machine Grades enable to link the tool to a machine or a material. Grades are specific identifyer defined in the machine and material files. If the tool does not have any grade, it is available for any type of machine and material. But if a grade is defined in the tool, it is available only for this machine or material. You can define several grades per tool, by separating them with a comma.

JavaScript errors detected

Please note, these errors can depend on your browser setup.

If this problem persists, please contact our support.